 "Making stuff makes me happy,
so I try to make something everyday,
even if it is just a mess."
-Margaret Oomen of Resurrection Fern-
-
-
"Making stuff makes me happy, Hi everybody - miss me? :P I'm still here, still making stuff. It's just all very hush-hush for now. Ssshhh! ;) Cards and gifts will be posted as and when they are delivered. But I did manage to whip up this card just for fun today. It was a bit of a relief to make something random, with no names, occations or colour requests attatched. I think that's why it came together so quickly! Well, that, and the fact that it's a really simple card made from leftover paper scraps already on my desk. Almost a CAS card if it wasn't for the torn edges on the corrugated cardstock...?

It never ceases to amaze me how
even the most mundane household chores
become so much more enjoyable when done
in the bright sunlight!
-
Click here for more info on my Project 52.
 Having a card making evening at someone else's house is something I really enjoy, despite the troublesome packing and unpacking of stash... ;) Being restricted to using only the stuff I've brought with me is both a challenge and a blessing. It limits my choices, which sometimes makes it easier to choose, but at the same time forces me to be more creative with the stuff I have. There's the social aspect as well - this is a wonderful way to enjoy your friends' way of working. There are always tips and tricks to learn!
 Trying something new... I've taken some inspiration from the work of Dawn McVey and blended it with my own, and it became a look I really enjoy! You can be sure to find more of this coming over the next few days. :) It was simple enough to layer the various Spellbinder shapes cut from Basic Grey papers, but harder to add just the right amount of stash in just the right place... I messed up the background a bit, so a sheet of BG Origins came to my rescue and covered it all up. ;)
 After the card drought of last fall, I'm trying to build up a decent amount of cards to bring to the beauty salon where I sell them. One technique is to make duplicate cards, although I must admit that I often find it difficult. The cards go through so many alterations along the way that I usually don't save any time making two at a time. These two came together reasonably quickly, so one went to a colleague and the other to the beauty salon box!

 A while ago I made a card in memory of a young girl who died of cancer. Today I've made a card for the same occation, but for a man in his seventies. These cards are always tricky enough as it is, but even more so when it should be suitable for a man... The Wild Asparagus pad was on my desk already and I picked two papers in blue, white and tan, with white Bazzill cardstock as the base. The bird stamp by Tim Holtz is embossed in Walnut Stain Distress powder, framed by some white corrugated cardstock. The "remember" rub-on in the corner is balanced by some Magic Mesh and a metal ring in the opposite corner. After some internal debate on what level of distressing I wanted, I settled for just a light inking of the white cardstock using Distress Ink Vintage Photo.
 The lovely Wild Asparagus paper pad is one of those I keep wanting to use, but never do... The colours are just so tricky to match to my Bazzill cardstock. Kristin pointed me towards some criss-cross cardstock that looked terribly yellow in the store, but turned out to match these papers perfectly! Thanks! :) I went for a simple, fairly symmetrical layout and still managed to mess up the proportions a bit, but it's still usable.
 Three flowers, two brads and a ribbon. Surely there has to be a challenge with a recipe like this out there right now? :P All edges inked with Distress Ink Vintage Photo and Walnut Stain. Stempelglede swirly stamps.
 Tea with milk is one of those things that usually make me shudder. I like my tea as I like my coffee - clean and simple, no milk or sweetener of any kind. But then this chai recipe came along... I can't remember who sent me in the direction of this recipe, but thank you, whoever you are. I love it.
 Chai concentrate, adapted from OregonLive.com:
 It's been so long since I did any serious card making that I've almost forgotten how... All my focus has been on knitting and sewing christmas gifts, but now it's time to get started on some paper crafting again. This card won't make anyone's top ten list, but it's done now and I feel like my fingers are slowly getting the hang of this again, and maybe the next one will be better. The sentiment stamp reads "Go confidently in the direction of your dreams. Live the life you have imagined." and is from Stempelglede.


 Just a simple pair of wrist warmers in the making, in DROPS Alpaca yarn leftovers (from these felted slippers). I'm improvising the pattern along the same lines as the purple pair, but with a slight adjustment of stitch count and shape to fit my own wrists this time. I already have a pair of wrist warmers, but they are very short, and more pretty than functional. Details at my Ravelry page as usual.
 When it came time to cut the openings for the handles in my denim firewood tote, I encountered a major obstacle. My original plan was to simply fold back the fabric and topstitch it in place, but that turned out to be a very weak and flimsy technique. Not only did it look bad, but the corners would definitely have frayed badly already after its first use. No, it was time to find a more sturdy solution! I vaguely remembered having seen a tutorial on something suitable ages ago, but only had a very vague ide of how it would look when finished, and no idea at all of how to get there. After an hour searching for it on Google with no luck, I spent another hour with pen and paper to figure it out for myself. There's just no stopping me when I get these ideas stuck in my head. ;) And I did figure it out! :D So although there is a tutorial out there (and it's probably written better than mine), I thought I'd make my own, just in case anyone needs it. Maybe mine will show up on Google. ;) It must be said that I am an amateur sewer and really have no idea of what I'm doing here. You have been warned.
 Sew a rectangle along your lines (refer to picture above). Then, cut into both fabrics in a 45 degree angle towards the corners (refer to picture). My opening is not square, so I did a straight cut across the center, to connect the angled cuts. As mentioned before, you can see that I had already cut a hole in my main fabric as a part of my discarded Plan A, but that's not nescessary. Lines are all you need. Go as far as you dare to the corner, but be careful! If you cut too close, the fabric will unravel - or even worse, you'll cut the actual seam.
 This is the fun part (and the one it took me a while to get my head around when planning this thing): turning everything inside out! Grab the lining fabric and pull it from the right side through the opening...
 ...keep pulling and turning...
 ...and turning, until all the lining fabric has been brought to the reverse side. You are now looking at the right side of the lining fabric and the wrong side of the main fabric! And now you can see the size of my lining piece. You may have to do some small additional snips towards the corners if they are very bulky - just be careful to not cut too close, or to cut the actual seam! You will now have two layers of fabric with angled cuts hidden under the visible part of the lining.
 Pin in place, pulling the lining well back. I pin from the wrong side, but will sew on the right side, so I take care to ensure that all pins are accessible through the opening.
 Topstitch as close to the edge as possible. If you look carefully, you'll see that I've offset my needle all the way to the left, enabling almost the entire presser foot to rest on the fabric and both feed dogs to grab onto the fabric. You might find it easier that way, instead of having half the presser foot floating in the air... I did a second topstitch seam outside the first, just to make it match visually to the rest of the tote. Also, if you have have to sew across french seams, like I had to here, I strongly recommend hand feeding the needle over the thickest parts.
 This is what it should look like from the wrong side. See the little wrinkle in the bottom right corner? That's the reason for topstitching on the right side. ;)
 Ta-daa! Flip over and admire your finished result! I'm so proud and satisfied with this, you have no idea. :P It looks twice as good and must be at least four times stronger than my first plan!
 A closer look at the details. You can just spot the lining fabric in the opening.
 And here are my two openings, ready for the handle to be inserted.
  This was a christmas gift for my dad this year! I've finally managed to write up this post - and there are quite a lot of images here. That's just how it goes when I'm very pleased with what I've done! :P I haven't sewn much in my life, so completing this project felt really relly good. Even so, it is a fairly simple thing, this firewood tote. Basically, it's just a long piece of fabric with a handle in each end... Trust me to complicate something so simple. :)

 I thought I'd share a little bit about how I made this tote. It is by no means meant to be a full tutorial - there's no way I have the necessary sewing skills to make enough sense in a tutorial. Also, I made this up as I went along and that's no good starting point for a tutorial. ;) (Also, please forgive the colours of the pictures being all over the place - they were taken at different times of day and in wildly different lighting conditions and I haven't done a very good job at matching the colours in post processing.)
 The seam you find on jeans is the flat-felled seam. I've done something closer to a french seam, which is significantly stronger, especially when anchored by the two topstitched seams you see here. I did my own version of it, of course... *lol* Skipped one step and added another - because I wanted two seams to be visible from the front, rather than hiding the seam on the wrong side, like in the video. And obviously, there's no way you'd find me pressing these seams! Hah! *rofl*
 Sooo many layers... You can see the short-side seams are slightly off-set, because there's no way they would go through the sewing machine if they lined up. I hand-turned the sewing machine over these, every time. That's a good way to give yourself an aching arm, trust me. But this way, I only broke one needle! *lol*
 And there you have it, when folded at the middle they make the perfect space for a hand. After making the openings I put the fabrics right sides together and stitched down both sides. Then I turned it inside out through one of the handle openings and topstitched down each side near the edge for added strength (this seam is only just visible on the left side in the photo below).
 I cut two pieces from a broomstick handle and sanded down the edges. The handles need to be strong enough to carry some weight, but thin enough so you can comfortably get a secure grip on both handles at once. The topmost double seam holds each handle in place, while the bottom double seam secures all the fabric layers in this area - including the lining of the handle opening.
 Always sign your work! ;) I freehanded the letters and embroidered my name using double thread. I actually did my whole name, but have removed my last name from the pictures. All done, now go present it to your dad/mom/family member/friend and bask in compliments. :) If you have any questions, feel free to post them in the comments and check back later, and I'll try to answer them there. Keep in mind that I'm not an experienced sewer, so take any advice at your own risk... ;)

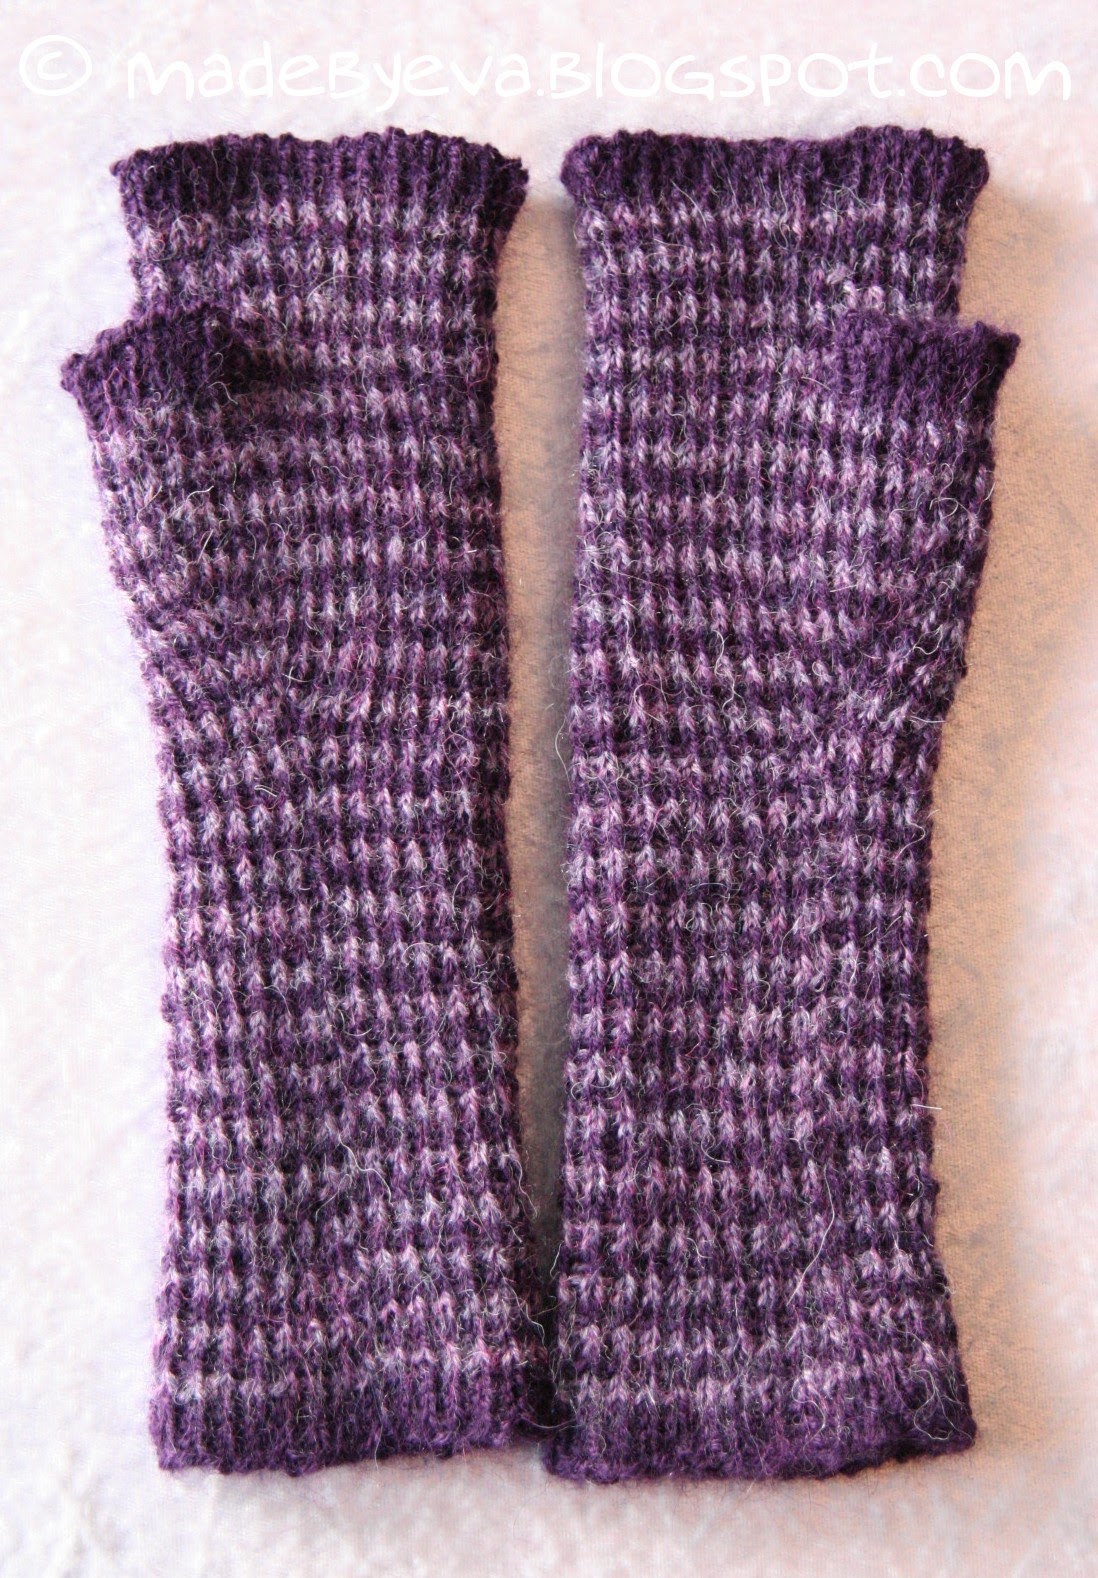 I used no pattern for these, just did a simple 1x1 rib, changing colours every second row. The ribbing makes them very elastic and snug-fitting, while also providing some extra warmth. The recipient is considerably slimmer than me, so there will be less of the stretching effect you see in the first picture. Even so, these still feel comfortable on my own wrists.
 Details on my Ravelry page as usual. It might, in time, include details there about how I made them, but it will probably read more as notes than a complete recipe...
 As the party season is winding down,
 Ahem... guess what? More slippers! :P Now, to be fair, I did warn you that I had made quite a few of these for christmas this year... ;) I suppose I could have put them all in one huge post, but the first one seemed so long that the rest needed to have their own time in the spotlight. These two pairs are the last you'll see in a long time, I promise.
  Above: The lovely, smooth outside. Below: The cool, funky inside. The slippers are completely reversible, so the recipients can choose which side they want to show off!
 After six pairs of grey slippers I decided it was high time to bring in some bright colours! This first pair was made for my sister in law and I think the colours fit her well. They are quite dominant in her paper crafting anyway... :P The second one is for my grandmother, who finally got something other than chocolate from me at christmas! (What do you give to grandmothers anyway?) I hope she finds these useful.


