Monday, January 13, 2014

Purple Echo shawl

I've made an Echo shawl once before, and liked the pattern for its ease and look. The rounded flowers are a nice change from the more angled stuff you usually see. Being familiar with the pattern, I knitted this one up in no time. Because of an originally tight time table, I did 7-loop nupps instead of 9-loop, but they look good all the same. Blocking was done a bit more aggressively than the first time, because the yarn is springy, and during the first few days of wearing my first shawl shrunk back a bit. Ravelry link.


Monday, January 6, 2014

Welcome 2014!

 
 A new year, a new book. A new day, a new page. Welcome 2014, and may you be a good one.
(The book above is a small compilation of my Instagram pictures from 2012, printed at Blurb. Highly recommended!)

I've been away for a while, as you may have noticed. Real life and all that. Priorities must be made, but I have found myself missing this space a bit lately. So while I cannot promise five posts a week, I can at least say that there will be some activity here now and then. How's that for commitment? :) :)

While I write some words about some of the stuff I've made that never made it to the blog in 2013, you can take a look at some Instagram pictures showing what I've done instead of blogging the last six months. There should really be a photo of my TV in there. Really, there should be.
Anyway, I'm off to watch the new episode of Sherlock. Again. :) Here's the slide show:

 I've taken a few walks in the awesomeness of nature, not always on the safest paths...

 ...seen evidence that life may survive in rough places if it adapts to its surroundings...

 ...made my favourite summer desserts a few too many times...

 ...picked wild blueberries (the real thing!)...

 ...grown my own radishes, with somewhat varying results...

 ...taken my first flight in far too many years...

 ...had a proper staredown with a lioness...

 ...watched the days turn shorter and shorter...

...changed to brand new studded tires that so far have seen snow only on a single morning...

...played and relaxed with family...

...and last, but certainly not least, had more than a few geocaching adventures! I could have shown you so many pictures relating to this sport/adventure/game/mystery solving/treasure hunt, but settled for this one, which is one of my favourite shots from last year.

There will be some posts coming soon. Some cards, and a few knitting projects. If you're curious, there's always my Ravelry page and Instagram to keep you occupied while you wait.

See you soon!

Thursday, June 27, 2013

A little baby girl

That leafy, vein-y, white thingy there was floating around my desk for weeks, trying to find its place on a card. It was failing miserably, until this card came together surprisingly quickly. It's for a colleague and her first baby. It's a girl! :)
 -

Thursday, June 20, 2013

Footballer Frank turns Fifty

Frank likes football. Frank turns fifty. Footballer Frank must have a festive footballer's fiftieth birthday card!! Okay, enough now. :) Does football field corners even look remotely like this? I must admit I've skimped on the research. In fear of accidentally including colours from his team's worst enemy, thereby ruining his birthday all together (again neglecting that research), I restricted myself to grass green and neutral white. And aaaany minute now, someone will probably laugh maniacally and point out that there's at least five teams that wear green and white shirts. My apologies. Anyway. Happy birthday, Frank!


Thursday, June 13, 2013

Flowery squares

I find that having a few general, non-spesific cards laying around is a great way to avoid that slightly stressful situation of having agreed to make a card for someone when there isn't really a lot of time available. They are usually simple, like this one, and feature a large flower or something, also like this one. And little to no text, again like this one. Very useful! Unlike this one, I sometimes leave some room for a little text stamp or sticker that can be quickly added when the occasion arises.
-
I used one of my precious huge Bazzill flowers on this one. When I learned that they would be discontinued (several years ago) I bought nearly every remaining set my local paper crafting shop had left. It pains me a little every time I see one go. But hey, this is what they were made for! :)

Thursday, June 6, 2013

Someone turned 40 a while ago, apparently


I've made a couple of cards lately and haven't shared. Too busy looking at other people's work, I suppose? Here's a card I made one late evening, just in time as usual. I can't even remember who the recipient was - someone who turned 40, obviously. I think it was made for a guy? Oh well. Here it is, anyway. I like the rough, grunge-y style lately, but enjoy mixing it up with bold colours. Teal is awesome. :)

Friday, May 3, 2013

A little math lesson

Just in case you've all forgotten most of your math knowledge, I'm here to remind you of the basics. Two people celebrate their 60th birthdays, how many years old are they combined? You might have guessed the answer by now (spoiler above). The party invitation had something related to this number, some point or joke or story, but I haven't seen it myself and have forgotten what it was all about... Oh well. I like the card anyway, the colours are fresh and spring-y, but not too neon bright. It came together surprisingly easy with materials I had lying around from a previous, unsuccessful, attempt. Love it when that happens. And lastly, if you'd like to add some mathemagic to your day, I highly recommend the always amazing ViHart! :)

Saturday, April 27, 2013

Procrastination

When the to-do's become must-do-now's, which too often become should-have-done-last-week's, I usually go and grab some yarn and get knitting instead. This skein of DROPS Lace is a lovely mix of greys and the pattern is the Sunday mittens I've done once before. Using this thinner yarn, I'm hoping to make a pair that fits the tiny hands of my grandmother. My gauge is a whopping 50 stitches per 10 cm of stockinette stitch! That's a record. Also, that means I can procrastinate for a reeeeally long time with these mittens... Ravelry link.

Monday, April 22, 2013

Gift box

I've saved the box that my Galaxy S3 came in, thinking I'd make it into a nice looking gift box. The lid slides on in such a satisfying way and the inside is clean and elegant. The outside had a logo and some stickers that I painted over with white gesso, knowing that the sticky-back canvas I would cover it with is slightly transparent. Some careful cutting and folding gave me reasonably clean edges, but I chose to line the edge of both base and lid with some thin lace trimming anyway, and two extra strips down the center line for detail. A layered flower is the only other decoration. I filled it with some treats for a friend, as a house warming gift.
-

Monday, April 15, 2013

Gunn Berit 60 years

I never thought I'd struggle so much with this card. After all, I was asked for something white and silver, which is my standard go-to solution to any card that needs to be elegant for whatever reason. I must be out of practice. It took me several tries and I'm still not quite pleased... Maybe the last few cards, in a completely different style, has taken a stronger hold of me than expected?
Also, please excuse the teal tinge in the picture... Bad light, bad camera settings. Sloppy photography, this is. It's really white and silver, I promise. :)

Monday, April 8, 2013

TARDIS phone cozy

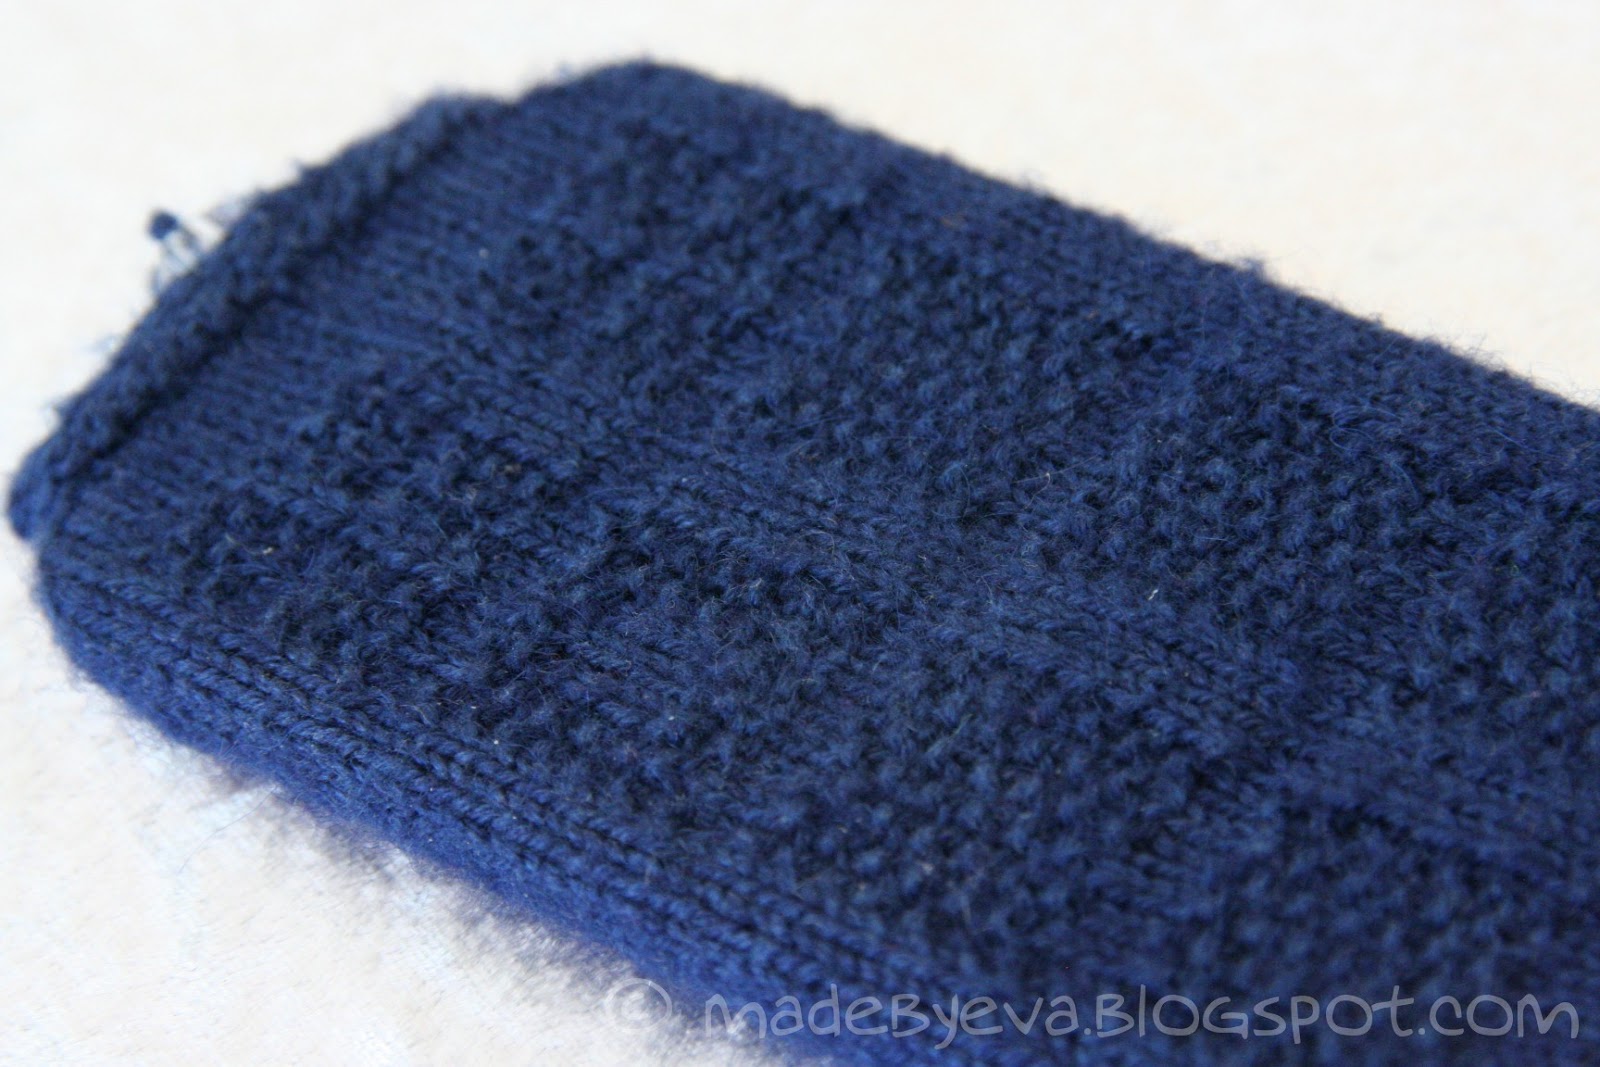
My phone already had one cozy, but I couldn't resist making this one too... The design is subtle, but if you know your Doctor Who you might recognize it as the TARDIS!
There are lots of TARDIS cozies out there, but I wanted one that was more elegant, more stylish, and in a thinner yarn, and so decided to make up my own. Those who don’t watch Doctor Who (what?!?) will see this as abstract decoration, but I know better. ;)
-
I found the bead in my stash and it's a perfect analogue to the TARDIS lamp! It’s attached to the back so it won’t scratch the screen - a loop on the front side closes the cozy and brings the bead forward.
-
The seed stitch mimics the door panels and there is a slight hint of window frames and the famous sign in one panel. The effect is subtle, and that's what I wanted. Details on the construction can be found at my Ravelry project page as usual.

Monday, April 1, 2013

DIY portable yarn case

Having done a lot of knitting with DROPS Baby Alpaca, I've had some issues with the very loosely wound skeins. They have a tendency to disintegrate and become a tangled mess in my knitting bag. Annoying. So I figured I would have to love to figure out a DIY solution, something lightweight and sturdy. And so I did! Now, I might have spotted something like this around the mighty interwebz at some point and the idea buried itself in my back drawer of inspiration... Or possibly, this photo of a bagel case that has done the Pinterest rounds lately might be where I got the idea, who knows. But I've had so many questions and comments about my case that I figured it deserved its own post anyway!
-
The construction process is simple: Find a CD/DVD spindle case you don't mind destroying repurposing. Make sure your skein will fit - there are many sizes available. Cut away the center pole in the base (now becoming the lid), leaving a hole in the center. Warning: this will take a sharp craft knife and some effort, as the plastic is quite sturdy. Some sort of power tool would probably make this task easier. Avoid cutting where the plastic is thickest and protect your fingers!! Missing fingers are not really an advantage for a knitter. Just saying.
-
Place your center-pull skein in the spindle case. You can see that mine is actually a perfect fit. Lucky me! For a bigger skein, use a bigger spindle case. Feed your yarn tail through the opening in the lid and screw it on.
-
Ready to start knitting! If you pull out too much yarn, just unscrew the lid and pull the yarn back, coiling it in the center, and reattach the lid. With this design, you'll have to place new skeins in the case before joining the yarn to the knitting - once you've started knitting with it, it's too late. If this is a deal-breaker for you, I suppose you could cut a slit from edge to center hole and slip the yarn through it, but that would be more trouble than it's worth for my part. It may affect stability and create edges that could catch the yarn and damage it. This version is simple, strong and functional.
-
The finishing touch: However hard I tried, I could not cut or sand the opening smooth enough to keep the yarn from snagging, so here is my own solution: I mixed a large dollop of epoxy glue, spread it on the edge of the opening and rotated the lid so the epoxy coated the cut edge evenly all around and on both sides of the lid. This requires a few minutes of continuous attention, but epoxy hardens fairly quickly and after a while you can put it down for a few minutes before flipping or rotating it. Just don't ignore it for too long until it has properly stiffened. When cured, the epoxy is perfectly smooth, even with all those bubbles! The yarn slides out easily without any damage.
If any of you read this and make your own, I'd love to know! Leave me a link in the comments and I'll come and check it out. :)

Monday, March 25, 2013

The greatest gift

See, didn't I tell you there would be more cards like this? :) I was in need of a baby card and wanted to see if I could translate the idea to something more soft and subtle. The recipe is the same: Base paper whitewashed with Gesso, washi tape strips on the diagonal, semi-random stamping and the oh-so-gorgeous molding paste. Love it! The text is a washi tape saying something like "So small, but the greatest on earth" - but it loses something in translation...

Monday, March 18, 2013

Playing with new materials!


Oh, the joy of brand new materials! That first attempt at a new technique! :) It brings a whole new excitement to the crafting of stuff, of all varieties. :) In this case, I've had a go at using Golden molding paste and a mask, and creating a slightly different style than usual. Fair warning: You're going to see more stuff like this. ;) It took a couple of tries to get it right, but the results, oh the results! Can you tell I'm excited about this one??
-
The base of this card is a pattern paper that I whitewashed with Gesso and water to lighten the colour. A few sprays of green GlimmerMist brought it to the right colour. I then went crazy with two kinds of washi tape, tearing strips and layering them roughly along the diagonal. Some stamping here and there adds to the detail. And then I added the molding paste, and the stars aligned. The hardened paste has absorbed some of the colour of whatever medium it rests on, so parts of it are faintly green from the GlimmerMist, and some are tan from the stamping ink. The parts that sits on the washi tape are still crisp white. It all adds to the drama!
-
Just look at the pop-up effect of that molding paste! So cool. :)
There are so many layers of mediums on those chipboard numbers that I can't really remember them all... What's visible now is white Crackle Paint that's tainted green and brown by the Distress Ink layer below. Pretty good in the end, but it took a few tries to get the right look.

Monday, March 11, 2013

Water bottle cozies

The coffee machine at work broke this summer. This wouldn't have been much of a problem, except that I relied on it to supply me with ice cold, filtrated water as well. With no replacement in sight and the tap water there pretty much undrinkable, I had to solve the problem myself. So I started freezing a half full bottle of water at home and bringing it to work.
-
Now, this worked just fine, but I noticed a couple of things I knew I could find a solution to.
First: A bottle of ice water is, well, cold. No surprise there. Which made my fingers cold, which made my patients jump and twitch when I touched them, which, in turn, made taking x-rays of them a little bit tricky.
Second: If I left the bottle on a desk somewhere and didn't come back to it for an hour or so, it would collect quite an impressive puddle of condensed water. Which was merely inconvenient when the water dripped down my uniform making it half transparent, but really quite dangerous when the water gravitated towards electrical stuff (and that stuff's pretty much everywhere in a radiology ward).
Third: On hot days, there just wouldn't be enough ice to last the shift, even if I froze the bottle nearly full.
-
The bottle cozy not only keeps the water cold for longer, but is also nice to the touch and completely eliminates condensation. I brought it along on a canoe trip this summer, and enjoyed ice cold lake water the whole day, to the slight envy of my friend. I made her and her husband one each for christmas. :) Also, my cousin got one, but I seem to have forgotten to photograph it... Not a very exciting object, I suppose. I've got two myself, one for the 0,7 litre Imsdal bottle, and one for the 0,5 litre bottle.
-
How to make them, you ask? Well, it goes like this. Find a medium to thick yarn of 100% new wool, a hook that's one size smaller than recommended for the yarn. Make a tight spiral for the base, and just stop increasing when you start the wall. The cozy should be slightly wider and taller than your bottle (that's a precise technical measurement term, that). Hand felt in soapy water until snug (testing the fit regularly) and allow to dry on the bottle (refilling the bottle with warm water now and then speeds up that process). Ta-da, enjoy ice cold water anywhere. :) Ravelry links one, two, and three.
-